
Fluorescence Photography without Darkness
Read any guide on fluorescence photography and it will tell you that it needs to be done in the dark, the darker the better. When you look at fluorescence with a good excitation light in the dark the fluorescence look bright to the eye, but in reality the emission tends to be weak and it can easily be overwhelmed by ambient light. If you are shooting with a steady light source you’ll need a tripod and fairly long exposure and in that case you really do need to keep out stray light. But darkness is not necessary: with the right equipment and techniques you can take fluorescence photographs with moderate levels of ambient light – in a normally lit laboratory environment, underwater, and even outdoors. The photographs can look as though they were taken in pitch darkness, or you can add in controlled amounts of background light. And it sure is a lot easier to work in the light than in the dark.
Of course there is the disadvantage that you can’t easily search for fluorescence by eye to find what to shoot. If it is somewhat dim and you have a powerful excitation light you can find the fluorescence, but in some cases it is a case of exploring with your camera.
The Method
It is all a function of camera settings. With modern digital cameras plus a reasonably powerful electronic flash you can reject the ambient light while still capturing the fluorescence. The trick lies in relative exposures. When you take a flash fluorescence photograph with ambient light (room lights or sunlight) present there are two sources of light that contribute to the photographic exposure: fluorescence induced by your filtered flash, and ambient light reflected from the subject and the surrounding scene. Think of these as completely separate images, each with its own exposure requirements. If you can arrange it – and you can – so that the fluorescence part of the image is properly exposed and the ambient light part is severely underexposed, the result will look as though the ambient light wasn’t even there.
The duration of a typical electronic flash is about 2 milliseconds (1/500 second), and the fluorescence only exists when the flash is going off. (Yes, there will be some trivial amount of fluorescence excited by the ambient light, but we can ignore that here.) By setting your shutter speed as fast as the camera will allow (except no shorter than 1/500 sec) you don’t take anything away from the fluorescence part of the exposure, but you reduce the visible light contribution. If you can underexpose the ambient light portion of the image by 3 f-stops or more (about a factor of 10) it essentially disappears.
So here is what you need:
- An electronic flash fitted with an appropriate fluorescence excitation filter. The more powerful the flash, the better.
- A barrier filter on your camera lens that blocks the reflected excitation light and transmits the fluorescence.
- A camera that can sync to the flash at fast shutter speeds. Ideally at least 1/200 second, and 1/250 to 1/500 is even better. Do not go shorter than 1/500 second even if your camera will let you.
We have used this technique successfully with many different subjects, in many different locations. If the ambient light is too strong or if the fluorescence is too weak this technique won’t work as well, but it certainly works nicely in most laboratory or home lighting conditions, and even outdoors and underwater if you are not in full sunlight.
If you want to mix in some ambient light to provide context for your fluorescing subject or for artistic purposes just use a longer exposure time (slower shutter speed). This will not affect the fluorescence portion of the image, but the longer the exposure the more background light you let in. With some trial and error you can find the balance you want.
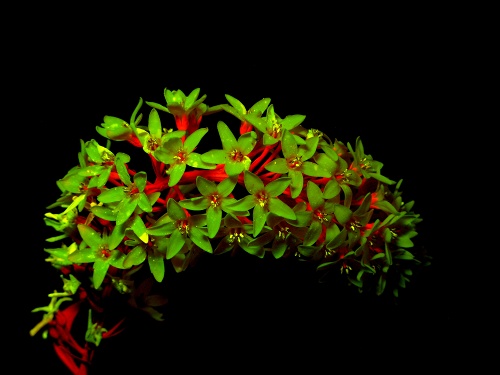
The images below are of a Gooseneck loosestrife flower. The plant was in a vase indoors, and the white-light shot was taken without a flash. The fluorescence image was taken seconds later under the exact same lighting conditions, except with the addition of the flash and a fast exposure. The camera settings were:
- White light – ISO200, 1/40 sec, f3.5
- Fluorescence – ISO200, 1/250 sec, f5.0
-
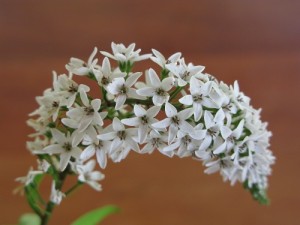
- Gooseneck loosestrife – room light

-
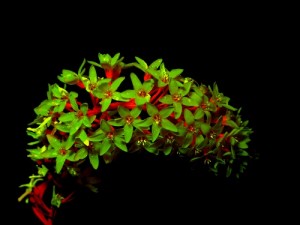
- Gooseneck loosestripe – fluorescence
We originally figured out this technique as applied to underwater fluorescence photography, in order to remove the necessity for night diving. A scientific paper on this application, titled Underwater fluorescence photography in the presence of ambient light, was published in the journal Limnology and Oceanography: Methods. The paper describes the technique and analyzes the range of conditions in which it can be applied underwater, using a combination of modeling and experiment. The paper is available for free download from the Wiley Online Library web site.
Here’s an example from underwater. Three photos – one with ambient light, one with a white-light strobe, and a fluorescence image with filtered flash and barrier filter. You can see just a little bit of ambient light in the lower left corner of the fluorescence photograph. The depth was about 40′ (12m) and the pictures were taken at 4 in the afternoon, in Bonaire. Photo settings:
- Ambient – ISO200, 1/125 sec, f3.5
- White light flash – ISO200, 1/200 sec, f6.3
- Fluorescence – ISO200, 1/200 sec, f6.3


