Fluorescence Appearance can Depend on Excitation Wavelength
With fluorescence, what you see can depend on how you excite and view the subject. The interaction of the excitation wavelength, the fluorescing substance, and the barrier filter can lead to different appearances in the final image. What is ‘true’ or ‘best’? There is no simple answer to that and it can come down to what your purpose was in taking the image and what looks best to you.
When I gave a presentation on The Function of Fluorescence on the Reef to the Boston Reefers aquarium club. I brought my stereo microscope, outfitted with the NIGHTSEA Stereo Microscope Fluorescence Adapter, along with me to the meeting to show the attendees first-hand what coral fluorescence looks like at higher magnification. Club Treasurer Tony Diep brought along some small corals that we could look at. One of these, a specimen of Cyphastrea sp., produced an interesting set of images to illustrate the influence of choice in excitation and emission.
In the gallery below are four images, taken under the following conditions:
- White light LED illumination
- Violet (~410 nm) excitation, no barrier filter
- Violet (~410 nm) excitation, with a pale yellow barrier filter that completely blocks the reflected excitation
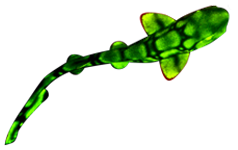
- Royal Blue (~450 nm) excitation, with a yellow barrier filter that completely blocks the reflected excitation
(Click any image for larger view)
-
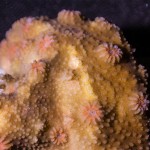
- White light

-
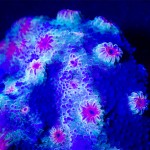
- Violet excitation, no barrier filter

-
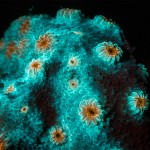
- Violet excitation, barrier filter

-
- Coral fluorescence

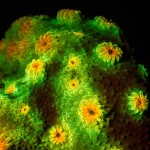
So what’s going on here? The coral seems to contain two main sources of fluorescence, an orange fluorescent protein in the polyp mouths and a cyan fluorescent protein in the surrounding tissue (the coenosarc).
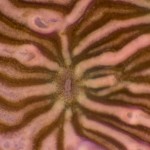
In the first image (white light) you can see the orange tint in the mouths but the cyan fluorescence is overwhelmed by the reflected white light and the coral appears beige/brown. This is the characteristic color of most corals that is due to light absorption by the symbiotic algae (zooxantheallae).
The second image (violet excitation, no barrier filter) is dominated by the reflected excitation light. The combination of that reflected violet and the orange fluorescence in the mouths yields the striking magenta you see there.
In the third image (violet excitation, violet-blocking barrier filter) we can now see the ‘true’ fluorescence of the specimen. The coenosarc fluorescence is what is expected for the well-known cyan fluorescent pigment (CFP) that has a fairly broad emission spectrum with emission peak at about 486 nm.
In the last image (royal blue excitation, blue-blocking barrier filter) the orange fluorescence of the polyp mouths is the same as it was in the third image, but the surrounding tissue fluorescence now appears green rather than cyan. This is not a different protein. It is the same cyan fluorescent protein, but the yellow barrier filter blocks the blue portion of the emission (below about 500 nm), leaving only the portion of the fluorescence that appears green. So from a technical standpoint this is a false-color appearance, not representative of the ‘true’ fluorescence of the subject. But it sure does make a nice image! Note that where the tissue fluorescence meets the mouth fluorescence you see a yellow color. This is an optical effect created by the mixture of green and orange sources, not a true yellow fluorescence.
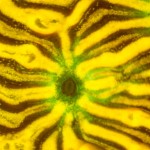
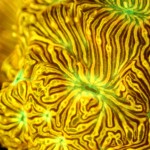
I also imaged a specimen of Leptoseris sp. that had two fluorescent pigments: a green fluorescent protein at the polyp mouths and a yellow fluorescent protein associated with the tissue at the structural ridges. In this case there was absolutely no difference in the fluorescence when viewed with the Violet or Royal Blue excitation/emission sets. Both were capable of exciting the two sources of fluorescence and of capturing the resulting emission.
-
- White light

-
- Royal blue excitation

-
- Royal blue excitation

Check out our blog post from this meeting showing how fluorescence highlights tissue growth extension.